

PayLink Learning Center
Product Scheduling
last updated July 7th, 2021
Overview
Product scheduling can be used with Online Ordering to systematically schedule which times of the day specific items will appear on your menu. This can be especially useful for merchants that have products on their menu that are only available during a certain period of the day, such as a happy hour. With product scheduling, you can select which products you’d like to be displayed on your menu within a particular time frame. For example, you can have a specialty burger and draft beer that only shows on your menu from 4:00 p.m. - 6:00 p.m. and are hidden for the rest of the day.
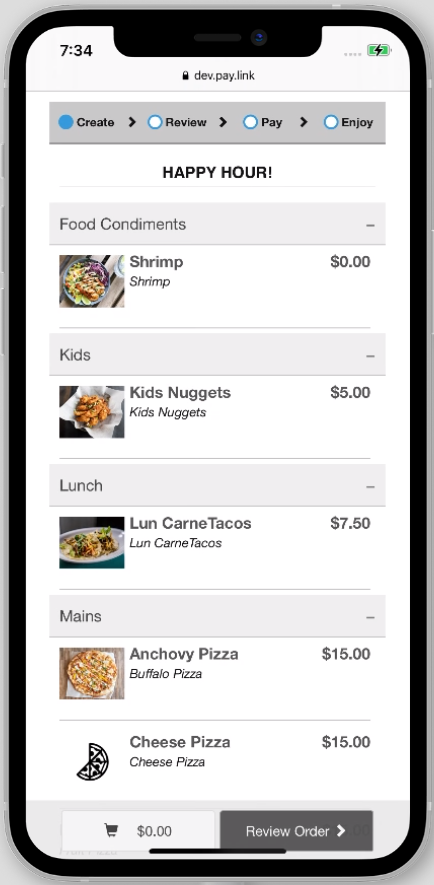
Product Scheduling uses a tagging system where you add TAGS to items or categories that you want to hide or display at specified times. Using a keyword or phrase to create a tag, such as HAPPYHOUR, you can configure special pricing and availability for specific timeframes by adding the tag to items and/or categories.
⇒ Important notes:
- Product schedules will automatically reset at 12:00 a.m. each day.
- TAGS can be added to any product on your menu, as well as entire categories.
- Only one schedule can be active at a time. (We'll explain this further below).
- We'll be using the TAG "HAPPYHOUR" to demonstrate.
- For the below example, we'll be keeping the price level at the default value of "Price Level 1 (Default)". See the next section for instructions on how to set up price levels.
How to create a schedule for a happy hour
1. First, you'll need to add TAGs to products or categories that you'd like to have in your schedule.
There are two different ways to add TAGs to products:
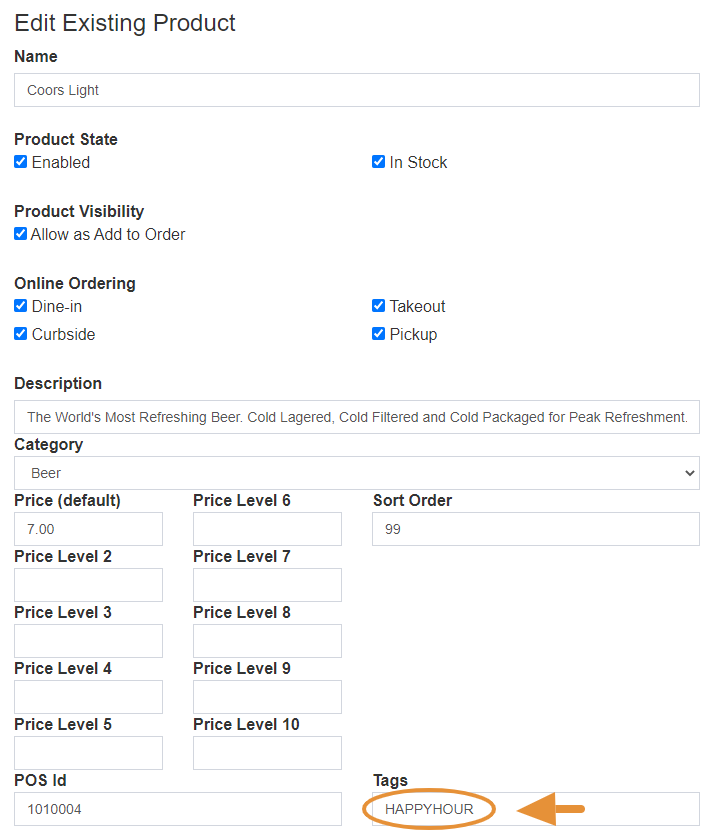
- Once logged in navigate to the Products 〉 Product List page and add the TAG to each product that you'd like to part of your schedule.
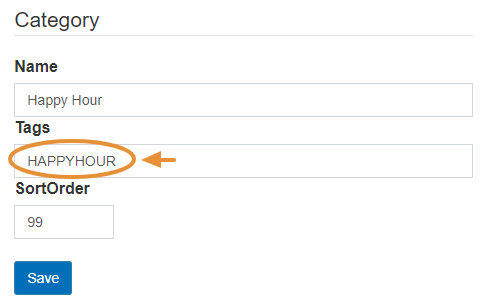
- Or you can add the TAG to an entire category of products from the Categories page.
Adding TAGs to products:
- In the screenshot below we're using the example "HAPPYHOUR". You'll need to add this TAG to each item that is part of your happy hour special.
- For example, if you have a total of 10 items available for happy hour, then you'd want to add the TAG to each of those items on the Products 〉 Product List page.
Adding TAGs to categories:
- Another approach is to add the TAG to an entire category. For example, create a category called "Happy Hour" then assign products, and add the TAG to that category.
2. Next, navigate to Products 〉 Product Scheduling to begin creating your schedule.
3. Click on “Create New”
- Note: To create a happy hour special you'll need to add a total of (3) separate schedules, and it's important to remember that only one schedule can be active at a time.
4. Select the day(s) of the week you’d like the product to be scheduled to show on your menu. For example, if your happy hour runs Monday-Friday, then select “Weekdays”
5. Product schedules will automatically reset every day at midnight (12:00 a.m.). Which means each day will begin with a clean slate. So when scheduling a special, such as happy hour, you will need to hide the items at the start of each day.
- Your first (#1) schedule should be set like this:
- Day(s): Every Day
- Start Time: 5:00 a.m.
- Description: Leave blank
- Hide items: HAPPYHOUR
- Show items: Leave blank
|
Day(s) |
Every Day |
You'll need to make sure the items on your happy hour are hidden at the start of each day |
|
Start Time |
5:00 a.m. |
Select a time before your store opens |
|
Description |
-- |
Leave blank |
|
Hide items |
HAPPYHOUR |
This will be TAG you created from step #1 |
|
Show items |
-- |
Leave blank |
This will hide all happy hour items from your menu at the start of each day.
6. Next, you'll need to make a second schedule for the start time of your happy hour. For example, if your happy hour begins at 4:00 p.m., then enter 4:00 p.m. in the time slot.
- Note: Remember, each schedule will run until the next one or midnight, whichever comes first.
- So if your happy hour ends at 6:00 p.m. you’ll need to add another schedule to hide the items again. We'll cover this further in step #9 below.
Your second (#2) schedule will display all the happy hour items that have been previously hidden by your first schedule. It should be set up similar to this:
- Day(s): Weekdays
- Start Time: 4:00 p.m.
- Description: Happy Hour!
- Hide items: Leave blank
- Show items: HAPPYHOUR
|
Day(s) |
Weekdays |
These will be the days that you offer your special or happy hour. For this example, our special is Monday-Friday. So we'll be using "Weekdays". |
|
Start Time |
4:00 p.m |
Anytime before your store opens |
|
Description |
Happy Hour! |
Enter a description or title for your special |
|
Hide items |
Leave blank |
|
|
Show items |
HAPPYHOUR |
This will be the TAG you created from step #1 |
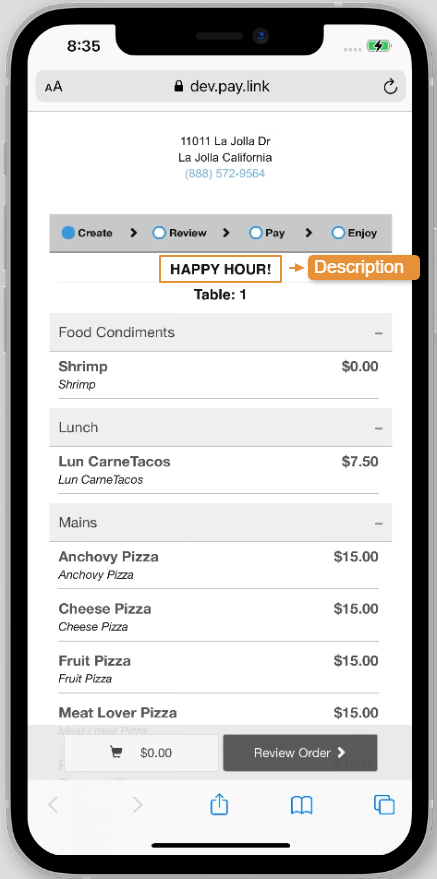
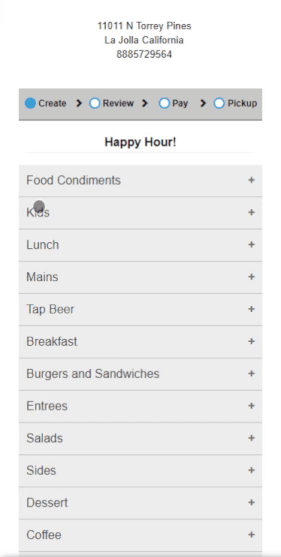
7. Add a description to this schedule if you’d like. For example, if you enter “Happy Hour” this will be displayed at the top of your menu when the schedule is active.
8. Lastly, you'll need to add a final third schedule for the end of your happy hour. So if your happy hour ends at 6:00 pm. then you'll add this schedule to start at that time and hide items again from your menu.
Your third (#3) schedule will be the end time of your special. This hides all the happy hour items again for the remainder of the day.
It should be set up similar to this:
- Day(s): Weekdays
- Start Time: 6:00 p.m.
- Description: Leave blank
- Hide items: HAPPYHOUR
- Show items: Leave blank
|
Day(s) |
Every Day |
This needs to be the same days as schedule #2 |
|
Start Time |
6:00 p.m. |
This will be the time that your happy hour will end |
|
Description |
-- |
Leave blank |
|
Hide items |
HAPPYHOUR |
This will be TAG you created from step #1 |
|
Show items |
-- |
Leave blank |
The final result will display happy hour items on your menu from only 4:00 p.m. to 6:00 p.m., and hide them the rest of the day.
Your completed happy hour schedule will look like this:

Price Levels
Price levels allow you to choose which price products will be when a schedule is active. This can be useful if you have items on your menu that change price later in the day. For example, an item that is $10 during lunch and then changes to $12 at dinner time.
This applies to all products on your menu. For example, if your schedule is set to “Price Level 2” then all products on your menu will be set to “Price Level 2” when your schedule is active. The price will only change if you have also entered a value for “Price Level 2” for the specific product. (See step #1 below for more details)
How to use price levels
Price levels can be used at the same time as a product schedule. However, for this example, we are going to set up price levels independently from product availability. We will not be hiding/showing items with TAGs in this example, but instead, we will only change the prices of products.
- Note: (See the next section for how to schedule products to be hidden/shown and use price levels at the time.)
Here we'll be covering the scenario where an item is $10 during lunch and then will automatically change to $12 at dinner time.
1. First, navigate to the Products 〉 Product List page and add additional price levels to each product that you'd like to automatically adjust the price of.
2. Next, navigate to Products 〉 Product Scheduling
3. Click on “Create New”
4. For this example, we're going to have a lunch item that automatically changes in price during dinner hours.
5. Select which days of the week you'd like the schedule to be active, and select a time for it to start. Such as, Weekdays at 6:00 p.m.
6. Select a new price level for this schedule. In our case (and most cases) we'll be using "Price Level 2"

This applies to all products on your menu. For example, if you select “Price Level 2” then all products on your menu will change to price level 2 when your schedule is active, only if you have also entered a value for “Price Level 2” for the specific product.
Your schedule should be set up like this:
- Day(s): Weekdays
- Start Time: 6:00 p.m.
- Description: Leave blank
- Hide items: Leave blank
- Show items: Leave blank
- Price level: Prive Level 2
|
Day(s) |
Every Day |
Select the days of the week you'd like this schedule to take place. |
|
Start Time |
6:00 p.m. |
Select a time that you’d like the price level to change. |
|
Description |
-- |
Leave blank |
|
Hide items |
-- |
Leave blank |
|
Show items |
-- |
Leave blank |
|
Price level |
Price Level 2 |
Select the price level you’d like your products to change to when the schedule is active. Note: Make sure that the price level is added to the product edit page. |
Your new schedule for price levels is all set up!
Your schedule will automatically reset at 12 am, so items on your menu will return to Price Level 1
Now, once the time reaches 6:00 pm on weekdays, the prices of all items on the menu will automatically change to price level 2.
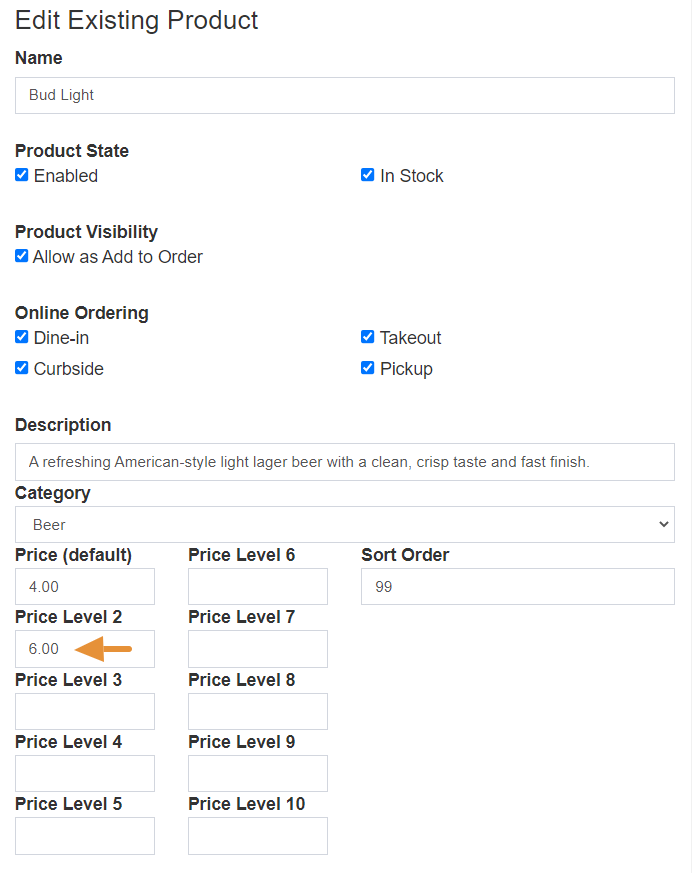
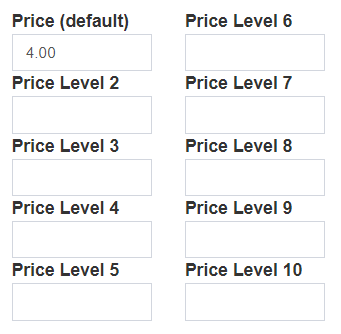
- Note: The prices will only change if you've added an amount for "Price Level 2" on the products edit page. If this is blank then the price will remain as the default. In the below example, the price will stay the default of $4.00 even though "Price Level 2" is active.
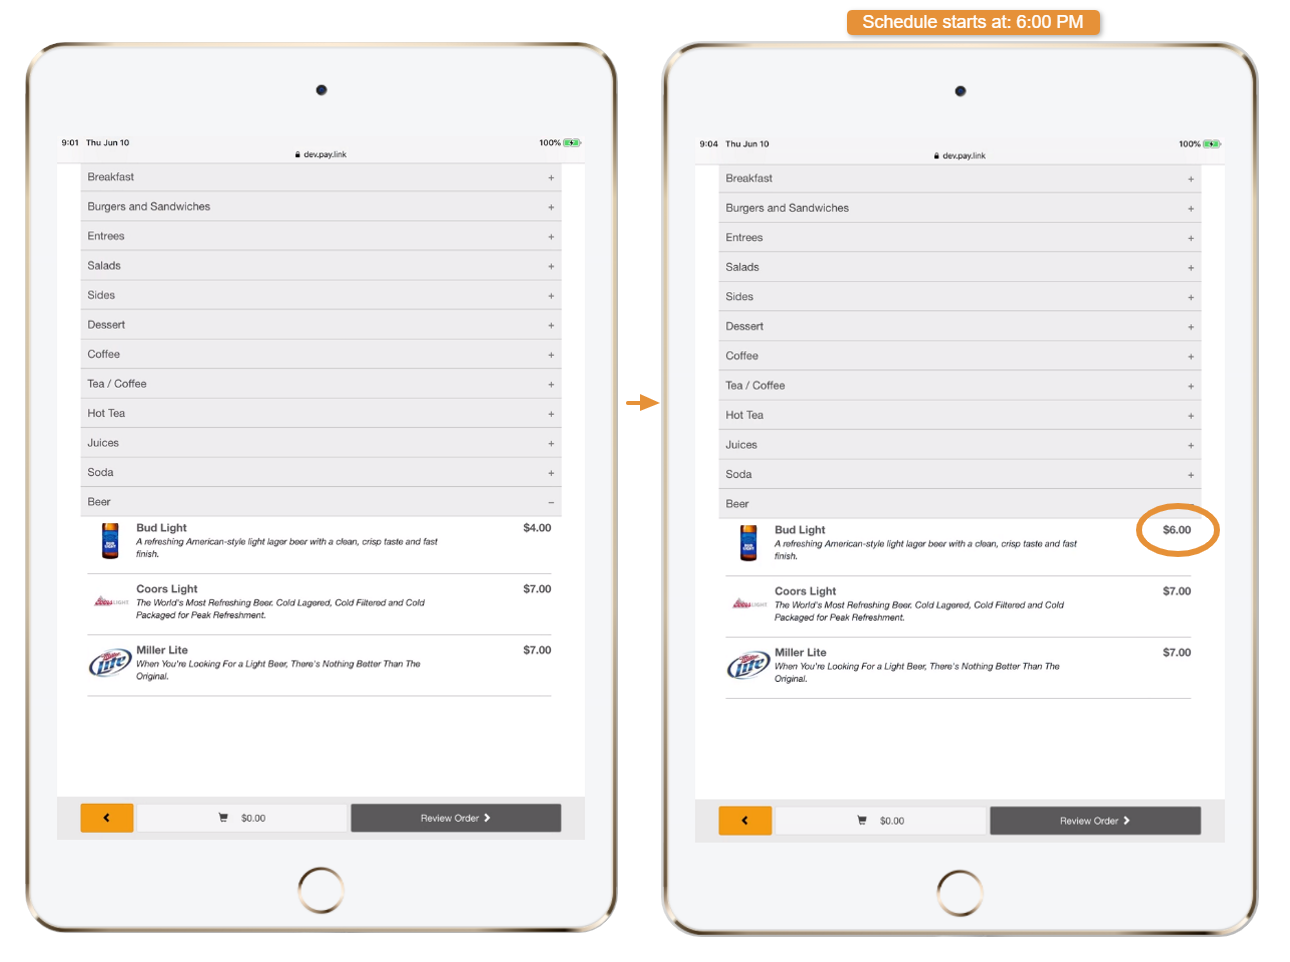
Now that we've automatically changed the price of specific products on our menu using product scheduling, let's review how this will appear on the customer's end.
Since we've added a Price Level 2 of $6.00 to the Bud Light the below illustration shows what happens when our schedule starts at 6:00 p.m. The price is automatically adjusted in the evening.
Product Scheduling with Price Levels
You can hide/show items on your menu and set up price levels at the same time.
In this section, we’re going to cover the scenario of setting up a happy hour schedule along with price changes on items for dinner time.
- Note: It’s important to remember that only one schedule can be active at a time.
1. First, add a Price Level 2 to each item that will change in price for dinner time.
2. Next, set up your schedule the same as you did for the happy hour example at the beginning of this article. It should look like this:

3. The only difference we made this time, is that for our final schedule (the one that hides items with the “HAPPYHOUR” tag) we changed the Price Level to “2”. As seen in the screenshot above.
This means all items on our menu (that have a Price Level 2 added on the product edit page) will be changed to Price Level 2 when our happy hour ends.
- Note: Since this is the final schedule of the day, it will reset automatically at 12 a.m. Each schedule runs until either midnight or until the next schedule takes effect.
The final result here is that items on our happy hour will only be displayed on our menu from 4 p.m. - 6 p.m. Then at 6 p.m. when our final schedule becomes active to hide the happy hour items, the Price Level is also changed to 2, so all products that have a Price Level 2 will show a new price starting at 6 p.m.
After the happy hour ends at 6 p.m., prices on our menu will automatically change to Price Level 2 (if applicable), and they will remain that price until it automatically resets at 12 a.m.
If you have any questions or need some assistance, please contact our Customer Service team at This email address is being protected from spambots. You need JavaScript enabled to view it. or 888-624-3687, Monday-Friday, 7:00 a.m. - 4:30 p.m. PT.